About familyplushomestead

a homeschooling family from the midwest, trying to share the ways we do it.

Time to talk Female Products

This post will ultimately be used as a resource for women who want to be resourceful with female menstruation supplies, prepared and  perhaps more mindful of the environment.  

Keep in mind that we may receive commissions when you click our links and make purchases. However, this does not impact our reviews and comparisons. We try our best to keep things fair and balanced, in order to help you make the best choice for you.

There are some things we can count on like clock-work and one of those is the workings of the female body.  Each month, most women of the age have their cycle.  

It’s such an important part of life that we prepare for it, and think through it.

First off, I like to have a 3 month supply on hand, there is nothing worse than having your preferred “kind” not be available locally.  I personally have my preferred kind set as a “subscribe and save” on Amazon!   You save a little extra money by having it set that way.

I want to take a second and talk quality. it’s super important in this factor to watch chemicals, dyes and more because it is the most vulnerable part of your body!  No pesticides, no harmful additives and more!   

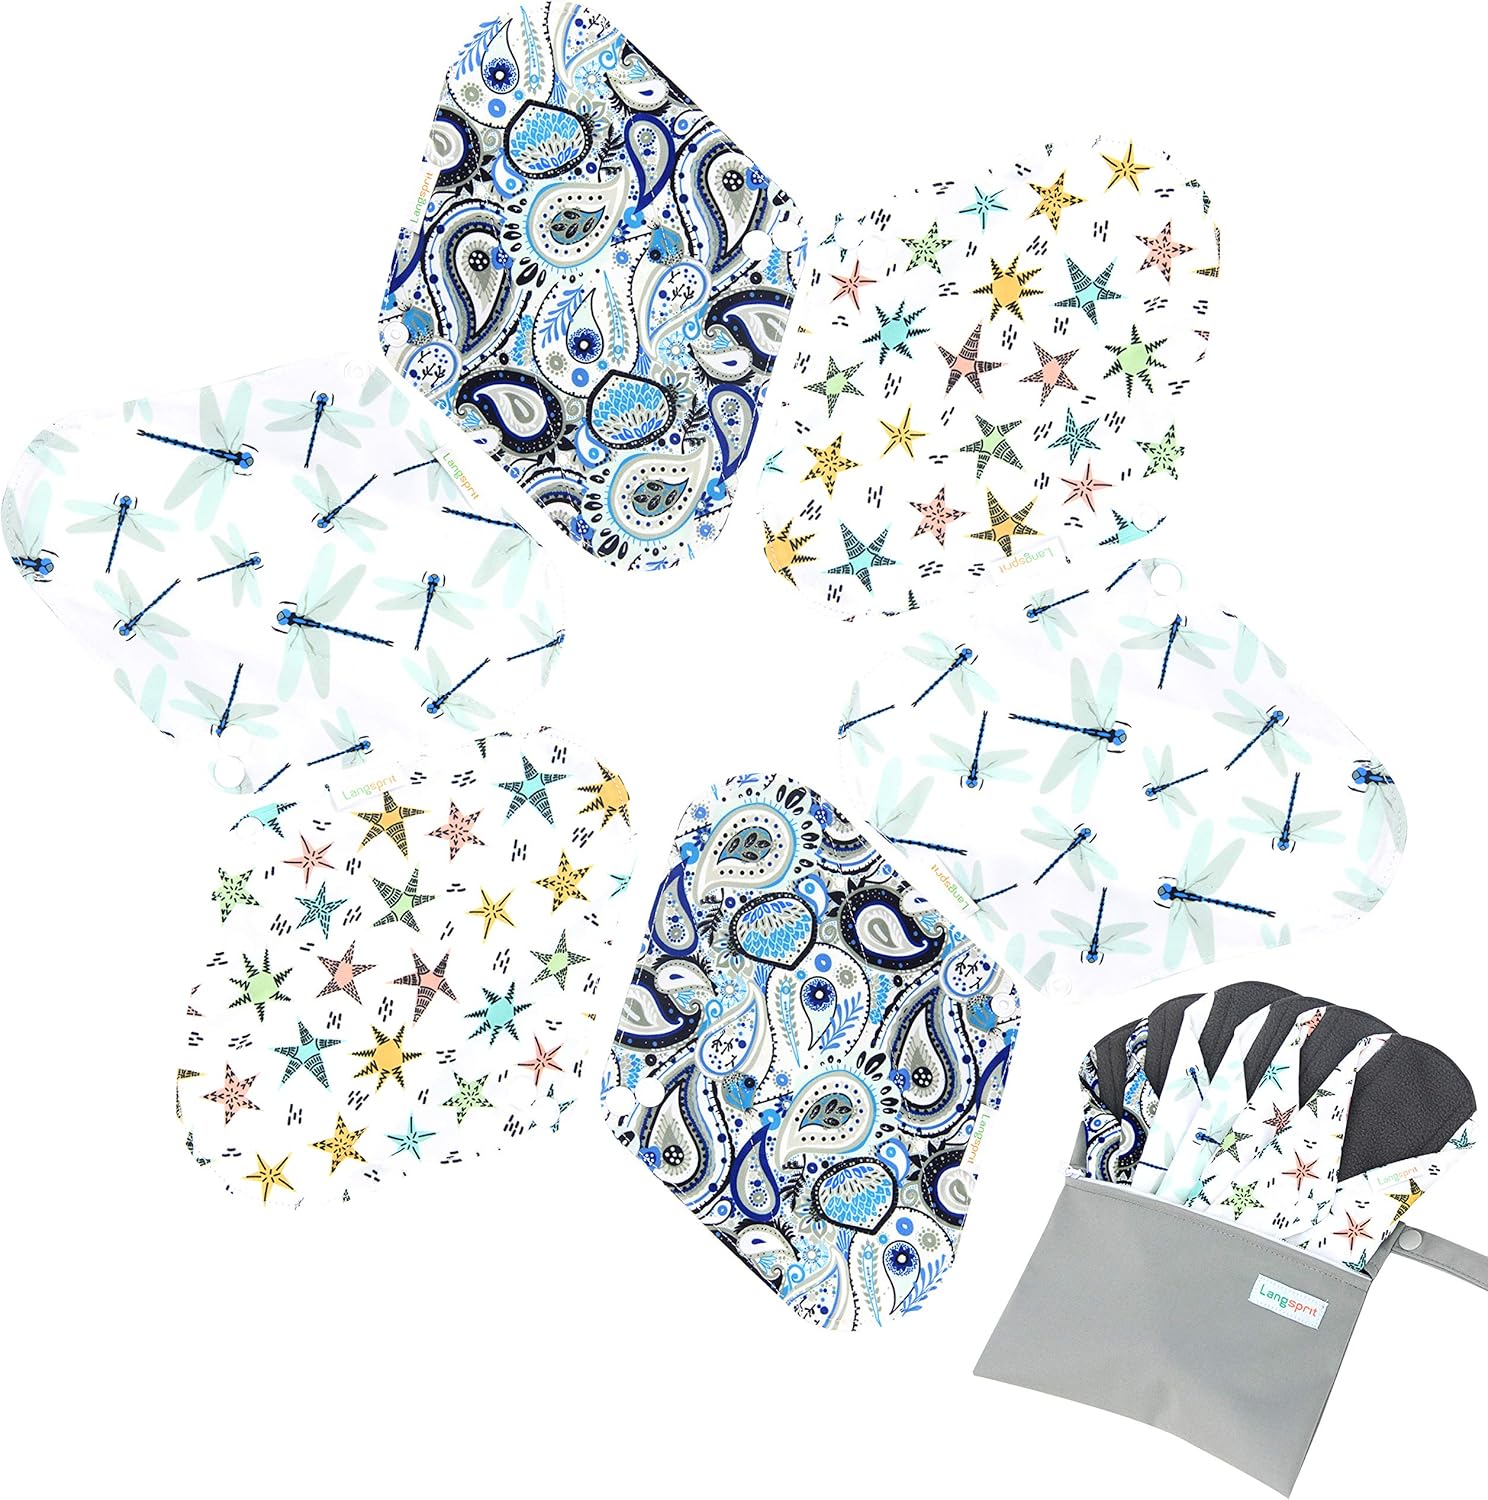
The next level for feminine care is consider going to reusable.  I personally prefer washable cloth~ I have some I use regularly and also some I stock up for emergencies!   Don’t count just for you, count for those you love who will eventually need! (I have some for daughters etc!).   See link ~ but these are super perfect to grab and go and a great price!

I personally have stashes of fabric and printed directions on how to sew saved up in my stock pile.

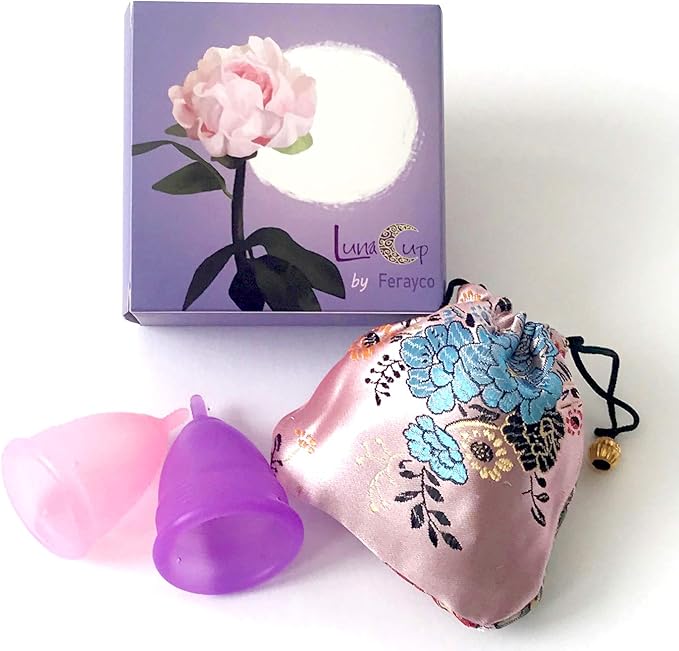
I do have these put aside, they didn’t work super successfully for me but I know that in an emergency, I won’t be the only person who needs coverage AND I know that if life wasn’t like normal, perhaps I’d be more invested in making this work lol!  Cups are very sustainable and portable, I’ve tried the Diva and this one is on the way to my house!   Full disclosure, I am in a houseful of boys, I work full time and I homestead full time,  there is a learning curve for these products!

You can also start with disposable cups to try the effort but they aren’t quite the same…  We tried these Softcup ones ~ with moderate success

Luna Cup Menstrual Cups Set of 2 Period Cups, 1 Large 1 Small with 1 Storage Bag

Whatever you do around your homestead, it’s worth the effort of a little forethought to make sure you are always prepared.


Blessings,

Amanda

Link

ok peeps!! Better the jars you have now and the pressure canner you have then none!!
Let’s talk!!
Jars are on sale in some places right now and impossible to find in other places.
First ~ ask around! Lots of people may have jars that they are just storing! You may need to do some elbow grease but the price may be right.
I set a price in my head what I’m willing to pay (either used or new) and what my goals are for purchasing jars.
I can 500 jars of tomatoes each year, we do 300 jars of peaches/ pears/ apples ~ add dry canning, meats, beans, soups, and more.
I have a big family, I prefer to can in quarts, you may prefer pints. I prefer large mouth (easier for things like bacon, raw packing….). your needs may be different. I always can some smaller ones into smaller jars for gifting!
You’ll want a pressure canner ::: the Mac Daddy is the All-American, https://amzn.to/3e72Ltr. made in the USA and never needs parts like seals . it is gorgeous and an investment to be sure.
I have always preferred to have 2 somewhat cheaper canners and I prefer the Presto. I use the large one because it not only holds the 7 quarts the smaller one does but it also can do a double layer of pints . prices are high on this right now online, but watch for places to have them, *Walmart and Target, but also your local farm shops *
It’s good to have a tall and a short one, because the bigger the canner, the longer it will take to build the pressure up (Talking that tonight in the class.)
Again, ask around, your grand-aunt’s cousin may have a presto in her basement, yes, it may be yellow! but that retro is back in stock!!
You can use a pressure canner bottom to water bath you’re jars… you cannot use a water bath canner to can the low acid food.
If you want a water bath canner ~ the large blue enamel ones are the most popular. https://www.walmart.com/ip/Granite-Ware-21-5-Quart-Canner-with-Jar-Rack/10543332
Again, you can use the bottom of your pressure canner or you can use a big stock pot!
Yes. ~ you’ll want to buy the canning supply kit once, you’ll use most of these! https://amzn.to/3gAD3iL
(cheaper on amazon then at the local farm stop!)
and then you’ll be READY To go!!
Here is our live video


Hope this helps you!

Amanda

Water is Required

This post will ultimately be used as a resource for people for sharing who are interested in water sources for storing, purifying etc.

Keep in mind that we may receive commissions when you click our links and make purchases. However, this does not impact our reviews and comparisons. We try our best to keep things fair and balanced, in order to help you make the best choice for you.

So let’s get started.

you need water to live.  Period.

When you are in the city and are preparing for water shortage events, what do you need to stock? According to Ready.gov ~ there is a minimum of a gallon of water per day per person for 3 days.  I’m going to be BLUNTLY honest with you.  If you lose power for a storm,  are dealing with blizzards, earthquakes or other natural disasters… 3 days can be nothing. That is for drinking and hygiene.  (and dont forget on top of your personal water storage, store for any animals you might have also!)  (yes, I know you have a pond in your development, but so does everyone else, where else?). scope out the paper maps,  be prepared to go to harder to find places, and be prepared by having it on hand ahead of time.

But… if you are going to store longer, you may need to plan on rotating and purifying!

You’ll want to check your water every so often, at least every 6 months.  Water just can get gross, undrinkable or worse! Inhabited…

Also, you’ll want multiples of all of the below.   In my head I hear, two is one and one is none… Don’t let this become like toilet paper, instead of playing “I dont have any! I need a leaf”.  You’re playing, “I was prepared, I need to restock.”  One is a whole lot less panicky then then other! Or worse yet, what if the emergency is blizzards and the pond is frozen, OR there is a chemical fire and what you thought would be your go to, isn’t.  You need water storage. 

I really like Rain Cachements ~ I can’t even understand how these aren’t legal everywhere but this is a truth.  Double check your laws.   You might be able to find “food grade” locally, BE SURE that you know what was in your bucket previously.  You’ll then need to do the adaptations yourself,    if you can’t find a clean bucket locally, this is my favorite. best reviews, decent cost. https://amzn.to/38dPJcm.

Multiple storage kinds. (see my favs below)

So I’m a fan of cheap, but let’s be honest, milk jugs just dont hold up over time.  I personally do use old apple juice containers for water that is stored primarily for toilet flushing etc.   Big family, lots of apple juice containers and it’s a thicker plastic,  even thicker than the plastic from the gallons of water you buy (and yes, I have those too..)

Storage cupboard by each toilet ~ we have storms all winter long that risk power outages!

Next up  blocks for water,  I like these because sturdy, and the blue blocks light so things dont tend to grow as easy.

This is literally my fav set here for the price:

and check out this gorgeous system: https://www.youtube.com/watch?v=pM6a64ga8sE

Multiple Purifying plans! Now, some people think you treat it going in and coming out, personally I believe the bigger deal is coming out.  I plan on BOTH purifying and Filtering if need be. You’ll want to have multiple thoughts here so here are some of my favorites :

The Aquamira Treatment is 4 years for 30 gallons for a great price.  We have some bags we carry on the way,  we have these tablets.   one table does 2 quarts of water in 3o minutes.  We carried these traveling internationally and we have them in our emergency bags!   ~

Then you need a filter system *or 2!*.   We have a Berkey. We live in the country and we filter everything we drink (hello farm run-off).

We have these LifeStraws  in our storage. They are the best of the best for on the go.

So you can see water gathering, storage and cleaning can be very overwhelming.  I’d love to hear from you if you have started this process and if this blog post has helped you figure out some steps!

Amanda 


Soap Making Part 1 (Intro and Easy!)

Let’s Learn About Soap Making! 

So approximately 10 years ago, I learned about making soap.  I honestly can’t remember right now why I tried this for the very first time.   I had a friend and I thought it would be fun to do together and  I was really into DIY things.  I’m not to terribly sure any other great reasons but I definitely am thankful for this event in my life because it eventually led me to Young Living and real essential oils.  I will be forever grateful to this journey. ❤

So there are 3 different ways to make soap.

  • Melt and Pour
  • Cold Process Soap
  • Hot Process Soap

Many many people start with the melt and pour because it’s easy and fun. It’s also a great craft to do with children because you don’t use Lye actively (more on that in a bit).

With melt and pour, you can choose your base (clear or creamy, goat milk or glycerin) and all you do is melt it in a double broiler and then pour it into molds.  You can add ALL KINDS of things

I personally love this little kit https://amzn.to/2S575B8

What kinds of things can you add:

  •  salts, oats, coffee
  • herbs and plants
  • essential oils (you knew I’d say it!)
  • color! (dyes, pigments, etc)

Some of our favorites have been rose petals or lavender buds.  They are easy to find online or at craft stores.   You can also press in small pieces of plants.  We love oatmeal in our soap, just whip it in a blender quick or use quick oats!

I love finding fun molds but so many things can be used, I linked one above in the little kit but you can also use plumbing molds, even a Pringles can (and cut into circles).  I personally prefer sillicone molds and watch for them at Goodwill etc all the time! This is a fun set for making a very traditional bar! https://amzn.to/2W7zsAb

Once you have your supplies, you’ll break your base up. You can cut it or break it into smaller chunks.  All you do then is create a double broiler (with a pot and a stainless steel or glass bowl. The bowl must be able to be placed on top of the pot without it touching the bottom (so bigger on top than inside) and melt.  For the next method of soap, we’ll be talking about hot process soap and for that we use a crock pot – I grab them at goodwills or garage sales! (they dont have to look pretty!). so if you have a crock pot, you can also use it for this method.

For every 1lb of soap you use, you’ll add 4 oz of water.  Regardless of the way you are melting, melt it slow on low!  and Stir it low,  if you stir too fast, you’ll get like a foam.

Once melted you pour into your molds ~ and you an add more fun on top (press with oatmeal for exfoliation etc!)

Let harden  and wala! your first taste of soap making. Stay tuned for cold and hot process soap blogs to come!

This is a fun intro to the project, it’s a great way to control your ingredients and it’s safe for kids to be able to be involved!

Blessings!

Amadna


Dehydrating Or Freezing Hashbrowns

Freezing and dehydrating Potatoes is one of my FAVORITE ways to put them away.

First disclosure:  I dont’ love buying conventional potatoes from the store, they are heavily sprayed so I prefer to purchase organic ones.  I get mine from AzureStandard.com and we grow a lot of our own.   When I buy from Azure, they come in LARGE lots.  This is one way I love to preserve potatoes.  (also super handy for potato sales!)

Potato, FREE Stock Photo, Image, Picture: Potatoes, Tubers ...

Steps To Dehydrate Potatoes 

  1. Bake the potatoes. ( there are other ways to do this, but this is the easiest for us!)
  2. Let Potatoes cool
  3. Shred the potatoes  (I usually do by hand but food processor also works!)
  4. lay on cookie tray to freeze and then portion into Ziploc bags OR
  5. lay on dehydrator trays and dehydrate ~ we do 135 degrees for approx 6 hours ~ (they should be crispy) then store in quart jars.

Don’t have a dehydrator yet?   I recommend watching craigslist or the marketplace because they can be pricey ~. the King of the Kings for us is the 9 square tray Excalibur, we have 2 for the full swing of garden season!  https://amzn.to/3apQy0V

If that’s a bit out of your budget, one of the things I think is the must have would be a temperature control!   I really like the looks of this one for the price.  We do have a smaller one like this and I use it for herbal drying! https://amzn.to/3eBaGAv

MasterChef Food Dehydrator w 5 Trays and Digital Temperature Controls- Dehydrating Machine includes FREE Recipe Guide- Overheating Protection + 8L Capacity- Dry Fruits, Vegetables Beef Jerky and More

To rehydrate.  1 cup dried usually yields approx 2 cups rehydrated.

To rehydrate vegetables, combine 1 part vegetable with 2 parts water.  We leave it for 15 minutes or so, drain off the water and then fry up!!

hope that helps!

Amanda

Keep in mind that we may receive commissions when you click our links and make purchases. However, this does not impact our reviews and comparisons. We try our best to keep things fair and balanced, in order to help you make the best choice for you.


https://amzn.to/2KfT1QW

https://amzn.to/2KfT1QW


https://amzn.to/2KfT1QW

https://amzn.to/2KfT1QW

Food Storage For Beginners

Keep in mind that we may receive commissions when you click our links and make purchases. However, this does not impact our reviews and comparisons. We try our best to keep things fair and balanced, in order to help you make the best choice for you.


So you’ve bought some extra food and now need to store it!

Here are some great tips!

First off ~ you’ll want to make sure your food is free of infestation before you start!  Pop your bags of flour, rice or food into a freezer for approx. 2 weeks to make sure you kill off any mites, etc.

Your first thing is to create an organized system: I personally love what we own: https://amzn.to/2KdT0Nw

you can make your own!  check out this beauty!!  https://cara.creapic.net/diy-rotating-canned-food-system/.   so many ideas over on pinterest if you are crafty!

DIY Rotating Canned Food System #canned #DIY #Food #rotating #system

What about your bulk storage?

A few ways to consider:   buckets/ mylar bags/ glass jars

you’ll probably be depending on what you store based on what the quantity you are storing PLUS how long you plan to store it.  I personally do not mylar bag for anything I plan to use in the next 6-12 months.    If I’m buying for long term storage, I do.

I find free pickle jars perfect for many short term things! I’ve even seen people use leftover 2 liter soda bottles (We dont’ drink pop but this may work for some!) for rice/ beans, wheat berries and more!

You can also use a food sealer and use quart jars :: We do this. A LOT especially with our dehydrated items!   If you don’t have a food saver, here is a smaller version: https://amzn.to/2KjXKRT

Need a food saver anyway?  this is one of the cheapest versions you can use the food saver can attachment with : https://amzn.to/2VmfLFe

now to be fair, the mother of all storage for preparedness efforts is the white bucket.  Since 1999 (the Y2K prep) I’ve had these white buckets with beans, wheat berries, oats and more!   I’m throwing an Amazon link here but I want you to know our local large box home stores have them (I dont know about Home Depot or Lowe’s. we live in the midwest, so we have Menard’s and both the buckets and the Gamma Seals are readily available and cheaper!    I’ve also purchased them from our AzureStandard.com pickup! https://amzn.to/2VmfUZi.

The Gamma seal is what you use for ease of entry (and are included in the above link)

The biggest game-up ante is the mylar bag and use use a sealer with that and usually desiccants ~ which remove the air. ~ you can then double layer these into the white buckets!   Make sure you label them!    This video is one of my favorite tools because they so clearly explain how to use most of those tools!     We really enjoy our product we purchase from azurestandard.com and were thrilled with the ease of this video.  https://www.azurestandard.com/healthy-living/smart-long-term-food-storage/

so I hope it helps you the same way!

https://amzn.to/2VmfUZi

https://amzn.to/2KjXKRT

Canning for Beginners: What do you need to have on hand?

Good morning!

We have a lot of interest in canning and before we get started I wanted to go ahead and give you a list of supplies.  These wll be primarily Amazon affiliate links but only because they are short.  FEEL free to beg and borrow canning supplies from friends, family and neighbors or grab on craigslist or marketplace!

Seriously, people have these things hanging around.

When you water can acidic items (fruits and jams) you use a water bath canner or a large pot with a rack~ https://amzn.to/3ca01f8

Granite Ware 21.5-Quart Porcelain Canner With Rack

When you can non-acidic food (meant, beans, vegetables) . you need to ues a pressure canner.  The “King” of this is the All-American canner ~ but the other option is this one, this is a great price (cheaper than our local big-box tore!) . https://amzn.to/2Vr2UlM

You’ll want jars,  depending on what you are canning, you may want pints or quarts and wide-mouth may have some convenience also.

Other tools: heres a quick set ~ honestly you probably don’t need all of it https://amzn.to/3a8dpi1 but you will for surely want a funnel and a jar lifter.

Hope this gets you started! Stay tuned

Blessings,

Amanda

Canning Chicken

There are so many benefits of canning chicken that I want to share today along with the process I use for doing so!  This is an important post.  (This works for turkey too!)

When you can chicken you make it:

  • easy to use
  • long shelf-life
  • can sort white meat vs dark meat
  • doenst take freezer space
  • tenderizes tough meat

I tend to do “hot pack” for chicken.   Raw pack is when you put the raw meat into the jar, cover with water and pressure can.   We do this with Venison and it makes it tender and yummy!!  We tend to do hotpack for chicken and ground meat.   There is a bit of benefit to getting to fill the jars.

I fill a roaster with chickens (also works for olllld roosters!) . this is GREAT to do if you want to roast a chicken for a Sunday dinner then use the rest of the meat later

Chicken, Roasted, Whole, Grilled, Cooked, Dinner

cover the chickens with water and run your roaster (I do this usually overnight)

Debone (or pick the meat off the chicken)   at this point you can choose to separate some of your chicken meat.  We love putting breast in some jars so that you can make a chicken salad.

Fill the jar, cover it with broth and follow appropriate  pressure canning procedures for your altitude.

Ways to use!

  • Chicken Noodle Soup (dump in broth and all!)
  • Chicken salad
  • Chicken Enchiladas
  • All the casseroles

yes ~ works for turkey also! (especially your thanksgiving leftovers or great way to use on sale meat!)

yes – can all of your broth too!

Garden Stew

One of the easiest soups to consider storing is that which you can do yourself
Our garden stew is
1 lb meat. (Can be venison, pork or beef)
Then quart jars or approx 2-3 cups of fresh cooked od the following:
Green Beans
Corn
Carrots
Potatoes
Then we did twice as much tomato 🙂. Let it cook down and it’s amazing.

I’m going to be doing some more frugal meals and also sharing some canning and storing techniques over in our Wise Woman Group ~

Love this with some warm rolls 🙂 It’s the perfect forgiving meal.
Dump in crockpot Etc!!!Image may contain: food